/ Scrapping with Liz

Shadow Tutorial with Freebie!

Someone suggested I do a tutorial showing how I shadow banners. I'm no expert, that's for sure, but I thought I would make a little video tutorial showing you how I shadow them. I'm using Photoshop CS3. I know that in Photoshop Elements there are more limitations as to what you can do, but I do show you my shadow settings which you should be able to use in Elements.

I always wonder if I'm doing things the right way. There are probably many other ways to do this but this is how I do them. Hope it helps.  Don't forget to grab the freebie below so you can try right along with me.


Just click on the pic to download.
Scrapbooking Banners for Photoshop


-Liz

Memories

I'm just going to pop in real quick tonight to show you a page I just scrapped about my grandparents. My grandfather passed away last week, and so I was inspired to scrap this page about my grandparents. My grandmother passed away 14 years ago. They were married for over 60 years! They had 6 children and from those 6 children: 22 grandchildren, 36 great-grandchildren, and 5 great-great-grandchildren!
Grandparents: Digital Scrapbook Page
My Journaling:
Even though my grandparents are gone now, they left such an amazing example of how a simple Christian life and marriage should be lived out that even in my life today I can apply those simple truths to my life. Examples of hard work, dedication, service, honesty, steadfastness, gentleness, trusting in God, not complaining or gossiping, etc. These are the things I remember about my grandparents and I pray that I will take their example and apply it to my life, daily.
Love - Matthew 22:37


Why Digital??

Hey there! Helen here to chat a little about digital scrapbooking. This post was supposed to be a tip or a tutorial but after days of trying to figure out what tip or tut to post I am throwing in the towel. However, I am awaiting the arrival of my new Photoshop CS5 Extended program as well as a book, Photoshop CS5 For Dummies. I have a feeling I will have lots to share with you as I learn the program.

I thought we could talk about why we chose to go digital in our scrapbooking hobby. For me personally, it was a hard choice to make....going digital. I should probably use the word "scary" vs. "hard". I could not wrap my brain around the whole concept of scrapbooking on my computer. Literally, I had NO clue about the any of it. Fear and lack of knowledge can keep you from trying new things all the time.

A year or so of pondering "digital" went by when one day I was in Archiver's browsing the latest and greatest tools, stamps, ribbons, etc. I stopped at the shelf of magazines and was thumbing through them when I saw one titled "Digi-Scrapping 101". I was intrigued to say the least. I soon realized this was just what I needed to make the leap into digital. It was a magazine with step by step instructions on loading the provided 30 day free trial of Photoshop Elements and creating your very first page. I mean, it was very detailed and precise, but that was what I needed. The CD with the trial offer for PSE also included all the digital papers, photos & elements needed to create the pages they walked you through. My favorite part was how they shared many websites where you could go and buy digital scrapbooking kits. It even explained how to make your purchase, download & unzip your new files.

That was about four years ago and I have never looked back. A few hours after installing PSE and working my way through the tutorials provided in that magazine I had a basic knowledge of what it was all about. From there I slowly honed my skills with the program by finding other online tutorials or just clicking on things within the program to see what it did.

My reason for going digital was merely curiosity but my reasons for staying digital are many!

1. It is SO easy (once you learn the basics of your program).

2. I can scrap on my laptop from my recliner!

3. No mess to clean up unless I spill the snack I am munching on as I create my page.

4. Much less expensive when you compare the average price of a digital kit ($4-$7) and the fact you can use digi papers, elements, alphas over and over and over again. Granted, you have printing costs & the cost of your program but seriously, overall, it is less expensive.

5. It used to take me hours & hours to do one page some days but with digi, it takes me on average, an hour to create a layout.

6. Scrapbooking forums & new friends!!! This is something I never even imagined was out there! I have made so many amazing friends by getting in to the forums and trying out for creative teams. I even met our very own eLIZabeth last year IRL while vacationing very near where she lives! When I think about all the other ladies I am going to meet in a few short weeks out in Vegas....I just want to squeal!


I am not saying I don't still enjoy going to my scrapbook room and getting out the scissors, glue & all my "touchable" ellies to create a cute card now & then. However, I am a digi-girl through & through now. I love the digi community. I love the designers I work for. I will never stop digital scrapbooking of my own free will.

So, tell me, why did YOU start digital scrapbooking? I would love to hear your experience. Leave a comment and share your story :)

xoxo,
Helen

Life with Liz - Video Tutorials, Sneak Peek & Chance to Win!

Well, it's another Tuesday....an almost normal Tuesday. My household has been sick on and off for the last 2 weeks and we are finally having a somewhat normal week.  It's been tough getting back into a routine but we are getting there, slowly but surely.

Anyway, on to today's blog post. I'm a visual learner. If I see it it's so much easier for me to learn and remember. So with that said, I thought I would maybe start a series of vidoe tutorials for all my blog followers. Here's just a short one to show you how to change up a template. Simple but I hope it's helpful.

Here's a video I posted on my facebook fan page a few days ago showing how I scrap (this one is higher resolution). It's sped up about 8x.  I didn't think you would want to watch 30 minutes of me scrapping!


Tutorial - Grouping Layers

Hi, it's Tiffany here. I'm bringing you a little tip that you might find helpful when you create your layouts. This tip is only for Photoshop, but there is an alternative (although not as versatile) option for PSE.

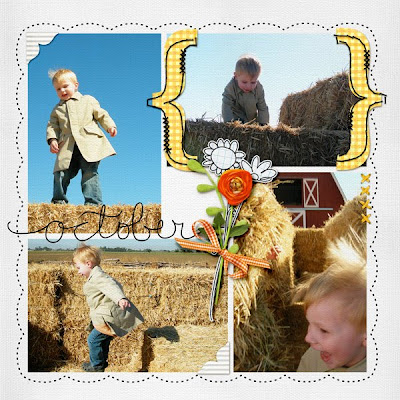
When I make my layouts I usually do not rename my layers. I place items in my page by dragging them in, and Photoshop automatically names them "Layer #" and that's fine for me most of the time. But lately I have started naming some of my layers and even taking things a step further, by grouping layers together. Grouping makes sense for a bunch of layers that go together as a unit - like the letters that form a title or the elements in a cluster. In this layout, I grouped the little cluster of flowers together:

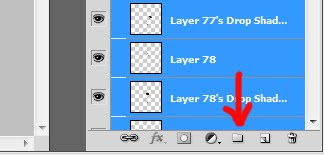
First, here is how you group layers: You need to multiple select all the layers you want to group together (by either Shift-clicking or Ctrl-clicking). Then drag your selection down to the little symbol that looks like a file folder.

This creates a new Group layer, and all of the layers have been collapsed into a single line. You can give the Group your own name if you like. I called mine "cluster."


I love that the layers have been reduced to a single line. Since they are all a functional group, I don't really need all that space being taken up in the Layer Palette. It makes scrolling through much easier.

If you make the Group the active layer, you can move the entire group around with the move tool. In my layout, I liked the little cluster I had made, but wasn't sure where I wanted to place it. With the Group feature, I could move the entire cluster around without having to multiple select all the layers.

You can click the Group's eye symbol to make the entire group disappear - you don't have to go and make each layer invisible by hand. I've used this when I have made two titles with alternate alphabets, and was trying to decide which I liked better. I could toggle the visibility of the title all at once.

For me, the best part about Grouping layers is that it does not "lock" them together. You can still very simply go in and modify a single one of the layers. All you have to do is expand the Group (by clicking on the little triangle) and all the individual layers will appear again, below the group layer. You can go and move a single layer around now, without effecting any of the others. And then when you are done, you can collapse it again - by clicking on the little triangle.
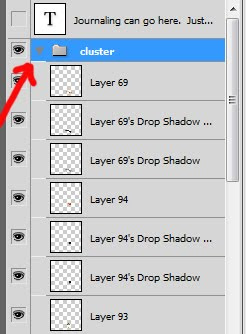

(In the Layers Palette, the grouped layers are slightly indented in the list, to signify they belong to the group.)

Besides grouping titles and clusters, I've also used it for layouts with multiple photos - once I was happy with the photos I grouped them all, and then I could more easily focus on embellishments, without needing to scroll past all the photo and clipping mask layers.

In PSE, the Group feature is not available, but you can Link layers together. This "locks" the layers together so that if you try to move one of the layers, they will actually all move together. It is similar to Grouping but with less versatility.

To Link in PSE, multiple select all your layers and then right-click over the Layers Palette and choose Link Layers (also available through the menu command Layers -> Link Layers)
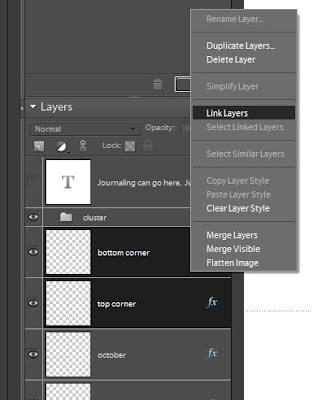

A little chain-link symbol will appear on each of the layers to signify that it is linked.

If you want to make the layers invisible, you have to click the eye symbol for every single layer. You CAN go back and move a single layer by itself, but you first must select all the linked layers, and then unlink them, and then you can manipulate the individual layers again. But then they aren't linked anymore. So you would have to go and select and link again if you wanted them linked. You cannot collapse the layers down to a single line with linked layers.

There is a feature in PSE called "group" but it is equivalent to what is called a Clipping Mask in Photoshop.

I hope you find this tip useful. It isn't something that I do in every single layout I make, but I have been finding my self using it more frequently. I think it just makes things a bit more organized, and when you've got 30 or 40 or more layers that's really helpful.

Keep your eye here on the blog for more tips and tricks coming your way each month!

© Scrapping with Liz
Maira Gall