
Happy Thursday y’all!
I hope this blog post finds you healthy and doing well with your social
isolation. I thought I’d take this time
to show off one of Liz’s products and hopefully spark your creativity and alleviate
some of your boredom!
Do you have the Fun Folds Overlay? This is something I love to use because it’s quite
versatile. First, there are so many different
overlays available – you can choose which one you want based on the number of
folds and how much of an effect you would like.
For instance, I clipped the Two Fold Light overlay on top of a 12 x 12
piece of paper.

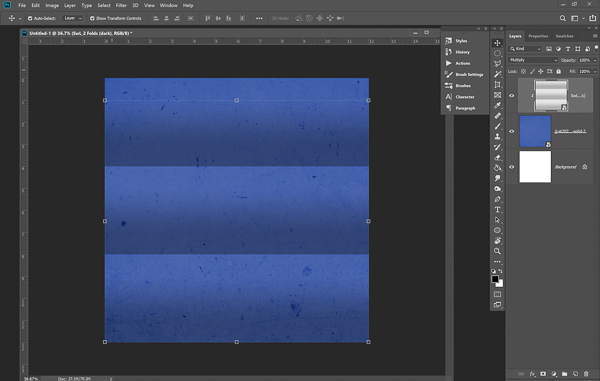
Now look at the same piece of paper, but with the Dark version
instead.

I used the same Color Burn blending option and opacity on
both, but as you can see, there is a much deeper folding effect when using the
Dark version.
You can also vary the blending mode and get quite
different results. Let me show you what
I mean! I’m going to use the Two Fold
Dark version clipped on top of a paper.
This first one shows what it looks like with
the blending mode set to Multiply and the second with it set to Soft Light.

The Multiply version looks as if the paper folds are being
pushed out while the Soft Light one looks as if the folds are facing
inward. How cool is that?
Don’t forget that you can move the overlays around too. In the first one, I clipped the Light Single
Fold version to the middle of my 12x12 paper, but in the second version I moved
it to the top third.


Can you see how you could use the same overlay and get an
alternative look?
Now you can also change the direction of the overlay. In the first one I used the Bonus Fold as is
with a blending mode set to Multiply.
But in the second version, I simply rotated the overlay 90 degrees.


It's a different look altogether!
But don’t think you can only clip these overlays to background papers! Fellow CT member Tiffany used one
on her journaling strip here:

Isn’t that pretty? It
really adds some visual interest to the page!
But I took the same overlay and applied it to my photo. I’ll show you how I did it. First, I clipped the overlay to my photo, moved it to the top portion of my photo, and
set the opacity to 49%. Can you see it here?

Next, I placed a shadow on my photo and then put it on it’s
own layer.

I then used transform to warp the top corner just enough
to give the illusion my photo is bending.

This is the final layout:

So not only did I “fold” my photo slightly, but I also made
it appear as if my background paper is folded too by using the Sideways fold
overlay. Like I said, this set of
overlays is so versatile that I find myself reaching for them again and
again. I hope you have as much fun
playing with your overlays as I do mine!
No comments
Post a Comment