Tutorial - Grouping Layers

Hi, it's Tiffany here. I'm bringing you a little tip that you might find helpful when you create your layouts. This tip is only for Photoshop, but there is an alternative (although not as versatile) option for PSE.

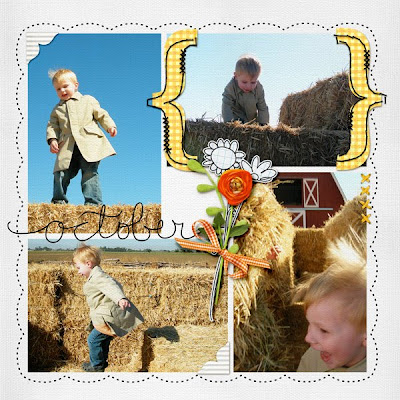
When I make my layouts I usually do not rename my layers. I place items in my page by dragging them in, and Photoshop automatically names them "Layer #" and that's fine for me most of the time. But lately I have started naming some of my layers and even taking things a step further, by grouping layers together. Grouping makes sense for a bunch of layers that go together as a unit - like the letters that form a title or the elements in a cluster. In this layout, I grouped the little cluster of flowers together:

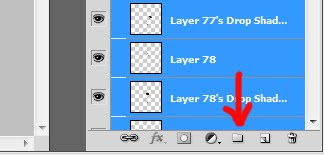
First, here is how you group layers: You need to multiple select all the layers you want to group together (by either Shift-clicking or Ctrl-clicking). Then drag your selection down to the little symbol that looks like a file folder.

This creates a new Group layer, and all of the layers have been collapsed into a single line. You can give the Group your own name if you like. I called mine "cluster."


I love that the layers have been reduced to a single line. Since they are all a functional group, I don't really need all that space being taken up in the Layer Palette. It makes scrolling through much easier.

If you make the Group the active layer, you can move the entire group around with the move tool. In my layout, I liked the little cluster I had made, but wasn't sure where I wanted to place it. With the Group feature, I could move the entire cluster around without having to multiple select all the layers.

You can click the Group's eye symbol to make the entire group disappear - you don't have to go and make each layer invisible by hand. I've used this when I have made two titles with alternate alphabets, and was trying to decide which I liked better. I could toggle the visibility of the title all at once.

For me, the best part about Grouping layers is that it does not "lock" them together. You can still very simply go in and modify a single one of the layers. All you have to do is expand the Group (by clicking on the little triangle) and all the individual layers will appear again, below the group layer. You can go and move a single layer around now, without effecting any of the others. And then when you are done, you can collapse it again - by clicking on the little triangle.
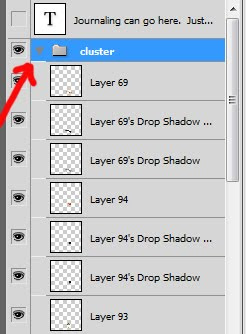

(In the Layers Palette, the grouped layers are slightly indented in the list, to signify they belong to the group.)

Besides grouping titles and clusters, I've also used it for layouts with multiple photos - once I was happy with the photos I grouped them all, and then I could more easily focus on embellishments, without needing to scroll past all the photo and clipping mask layers.

In PSE, the Group feature is not available, but you can Link layers together. This "locks" the layers together so that if you try to move one of the layers, they will actually all move together. It is similar to Grouping but with less versatility.

To Link in PSE, multiple select all your layers and then right-click over the Layers Palette and choose Link Layers (also available through the menu command Layers -> Link Layers)
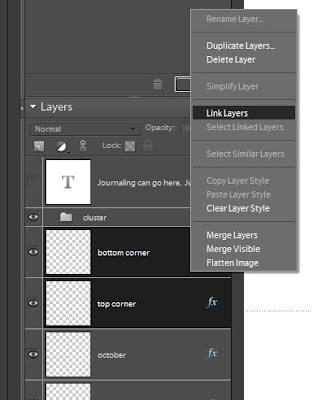

A little chain-link symbol will appear on each of the layers to signify that it is linked.

If you want to make the layers invisible, you have to click the eye symbol for every single layer. You CAN go back and move a single layer by itself, but you first must select all the linked layers, and then unlink them, and then you can manipulate the individual layers again. But then they aren't linked anymore. So you would have to go and select and link again if you wanted them linked. You cannot collapse the layers down to a single line with linked layers.

There is a feature in PSE called "group" but it is equivalent to what is called a Clipping Mask in Photoshop.

I hope you find this tip useful. It isn't something that I do in every single layout I make, but I have been finding my self using it more frequently. I think it just makes things a bit more organized, and when you've got 30 or 40 or more layers that's really helpful.

Keep your eye here on the blog for more tips and tricks coming your way each month!

Photo Editing - Getting Started!

Hi, Tiffany (Tiff) here. Liz recently asked me if I edit my photos or if I use photo actions on them. I do both, depending on my mood. Lately, I probably edit (either by hand or with an action) just about every single photo that I put in a layout. I consider myself pretty new to photo editing, but I think I can share with you two basic things you can do to improve your photos.

I probably started using photo actions about a year ago. I use the free photo actions available from The CoffeeShop Blog (most will work in PSE, and to show your appreciation you can donate to the author to help finance her site). After using actions for a while I started to notice a pattern: using a Screen blending mode will brighten a photo, and using a Soft Light blending mode will boost the colors a bit - two things most of my photos need.

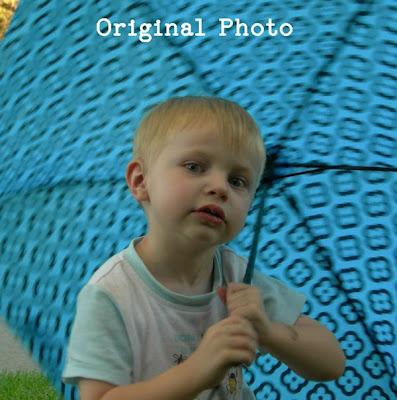
I will step you through an example. I'm working in Photoshop CS4, but the same steps should work in Elements, too. I'm starting with a photo that I took outside in the afternoon shade.


It looks really dark. Two years ago, I wouldn't have thought there was anything wrong with this photo, but today I would not consider it acceptable to put in a layout. Six months ago, I would have thought there was nothing I could do for this horrible dark photo, but that was before I learned about Screen.

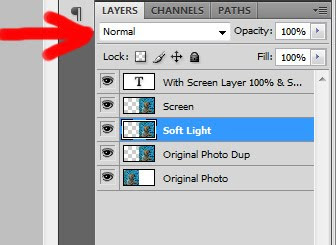
The general process to edit a photo is to duplicate the photo on several layers and then apply different blending modes to the new layers. The blending mode is accessed in the Layers Palette. At the top, there is a box, which in the default is set to "Normal." Click on that, and it will pop up a list of about 25 different blending modes you can choose from.


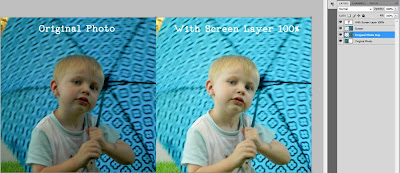
First, I will duplicate the image, and apply a Screen blending mode to the top layer. Here is the result:


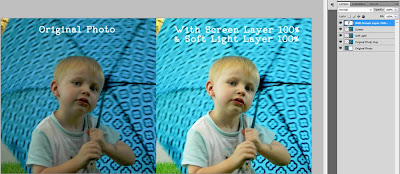
I'd say that is 100% better already. But, it is maybe a little washed out, so now I will go back to my photo layer and duplicate it again, this time applying a Soft Light mode to the newest layer (which is just above the original photo layer):


That last step isn't a huge difference for this particular photo, to my eye anyway, but I think it makes him look more real. If any of the effects are too dramatic, you can bring down the opacity of the layer to tame it a bit. On that last Soft Light layer, I would probably take it down to about 60%. On the other hand, if the effect isn't enough, you can make extra copies of the layers. You can also change the layer order. I found that with the Screen layer on top, the combined effect was a bit lighter than having the Screen layer on the bottom.

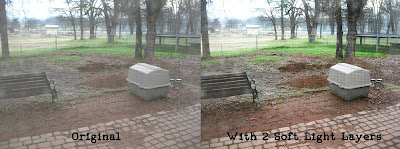
Here is another example of just using the Soft Light layer - to help you get a feel for what it does. This original photo looks real flat and pale, maybe because it was taken through a window screen. It is a picture of my mom's back yard, specifically where her septic tank is. (I won't go into the details of why I took this photo; let's just say we had a stressful couple of days last Christmas.) Here is the photo with two Soft Light layers:


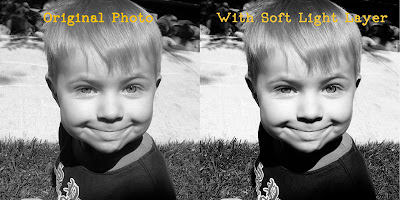
Soft Light works great on black and white photos too. If I were to describe the effect, I would say it darkens the darks and lightens the lights to give a more dramatic look:


I think the edited black and white above looks a bit more polished, although I suspect that being a newbie at it, I often overdo the editing. It's all a learning process!

That's about all I know about photo editing, and I hope it gives you a nice starting place to begin editing your own photos.

Silhouettes in Photoshop

Today I thought I would show you a little project I did at my house. I don't know about you but I love changing things up around my house every once in awhile. I like to hang up different pics, paint a room, organize a room from top to bottom, move furniture around, etc. I don't know why, but this is something I've always loved to do. I guess I like a little bit of change every once in awhile and it brings a little bit of newness to our house.

Anyway, I was getting tired of the picture we had hanging in our dining room. It's been hanging here in this house for over 2 years and probably another 5 years in our old house. So it was about time to change things up a bit. I had seen an idea in a magazine showing how to make silhouettes and then making a gallery wall with them. I thought it would look perfect in my dining room. I knew that I could do it all digitally with Photoshop my digi-scrapping supplies.

Here's how I did it. First I took profile photos of my kids against a blank wall. It's much easier if you get a pic with no shadow. You don't want two noses or two chins. It's easier to extract the photo. I extracted their profile, color overlayed it and turned it into a png file.

Child Silhouette in Photoshop

I took the png and made an 8x10 page with it. I used contrasting paper for the background and silhouette. You could fancy it up a bit by adding elements or whatnot, but I wanted to keep it simple. I added their names and the dates I took the photo. Here's one of the jpg's that I saved and printed:

Digital Silhouette with Digital Scrapbook Supplies
I printed and hung them on a wall with a mirror I found at an antique store. Here's a photo of my new wall.

DIY Silhouette Gallery Wall with Digital Scrapbook Supplies
disclaimer: I'm not a professional photographer or interior designers....it's just an imperfect picture in an imperfect house....but I like it!
I also decided it would be fun to scrap a page with the silhouette pngs on them. This is what I came up with. I think I like it better than my wall.

Digital Scrapbook Silhouette Page

Hope you enjoyed seeing a little bit of my house.

Life with Liz - A Scrapbooking Treasure

Welcome to the first weekly edition of "Life with Liz". This is going to be a weekly post by myself (ScrappingwithLiz), and I'll be posting about all different kinds of things: my life, my layouts, etc.  I guess the first thing that I should tell you is that I don't go by Liz in my "real" life. I go by Elizabeth. My mom never liked any of the nicknames for Elizabeth so I was always Elizabeth. When I started doing more stuff in forums, facebook, e-mails etc., it was always easier to just type - Liz. So that is why I go by Liz in my digi life. It's kind of fun having two lives!

Anyway, on to today's subject. I was over at my mom's and she had been going through some old photos, scrapbooks, etc. Well, as I was browsing through her stacks of photos I came across two older looking scrapbooks. So, of course, I had to take a peek. They were from my grandmother and they were dated 1966 and 1969 - a 40 year old scrapbook! I was excited. I knew scrapbooking must be in my genes. So I asked my mom if I could take them....not really sure what I was going to do with them but I knew I had to do something. I'm not even really sure what I should do with them or how I can preserve them. One of the scrapbooks is about travels that my Grandmother, Aunt, and Mom took through Michigan, Canada, and Montana. The other one, which is my favorite, is a scrapbook about a vacation my grandparents took with my mom when she was 9. My grandmother's journaling is on every page describing the pics, events, miles driven, places stayed, prices, etc. It's wonderful. Plus there are pamphlets and postcards from their travels across the states. This is a real treasure. Here's a little peek into the scrapbook.

This is the first page of the scrapbook of my Grandparents and Mom's travels:
"We (Dad, Mom and Sara) left home at 5:30 a.m. on August 25-Thursday-1966. We ate our breakfast in Jackson, Minnesota at 8:30 in a beautiful wayside park. Crossed the state line into Iowa at 9:30. 192 miles. We stopped in Whiting to see Floyd, Jessie, Jonathan & Mary Louise but didn't find them home. We ate dinner in the park where we took this picture. 324 miles."
That's my mom on the swing.


That's my mom in the left photo and my grandparents in the right at Mount Rushmore (my mom took that photo).

This page brings back memories. Yes I know, I wasn't there, but my family took a trip out west when I was growing up and I remember us seeing signs for "Reptile Gardens." My sisters and I made up a goofy song about "Reptile Gardens" and I remember laughing about it hysterically. I don't remember if we actually went there but I do remember the song!

Here's the last page in the book.
That's my mom and her nieces and nephews in the photo to the left. My mom was the youngest by about 10 years in her family so she already had lots of nieces and nephews.
"Tuesday, Aug. 30. Crossed into Minnesota at Pipestone at 10:00 - 2207 miles. Stopped at Truman to see John, Marcia and Andy was quite hot driving - but not as bad as yesterday when we had to stop at that Motel for ice cubes for Sara. We drove in hard rain after leaving Hayfield - decided we have driven 2447 miles by the time we get home."


And here's the traditional school paper my mom had to write when she went back to school in the fall. You know, the one where you have to write about something you did during the summer.

My Vacation
My Mother and Dad and I went to Greeley Colorado to see the mountains.
We came up through Wyoming and South Dakota and saw the Badland and Mount Rushmore. Then we all got home last night.


I'm so glad that my grandmother preserved these memories so that I can know more about my grandparents and mom's life. I want to do the same thing for my children and future grandchildren. Now I just need to figure out how to preserve these older scrapbooks so that I can pass them on.


© Scrapping with Liz
Maira Gall