Home Decorating Ideas / Scrapping with Liz
Home Decorating Ideas
Showing posts with label Home Decorating Ideas. Show all posts

Wonderful Cut Out - Hybrid Print

Totally Awesome Cut Files for Photoshop and Silhouette

I recently rearranged my girls' rooms. There was a need for me to update some of the wall art. I decided I would try some of my cut outs to make a print for their wall. I chose the 'wonderful' cut out from my Totally Awesome Cut Out pack

Wonderful Print using Cut Files for Scrapbooking

I used Warm and Cozy Paper from Mommyish, products from Bloom MPM, and the heart is from Totes Adorbs by Sahlin Studio.

I just opened up a new 8x10 document in Photoshop, placed my Wonderful Cut Out on top and then got to work decorating it. The hardest part was finding papers that worked together with the color scheme of the room. I added a stroke to the outside of the cut out to add more depth. Then I printed it on my home printer and stuck it in a frame. This is totally doable on a silhouette as well - svg files are included.

Wonderful Framed Print using Cut Files for Scrapbooking

I think it looks great on her wall, and I still have the print I made for her back in 2012! 

Wonderful Print using Cut Files for Silhouette and Photoshop

If you want more tips on how to use the Cut Outs Jenn just wrote a great blog post on different techniques to try when using them. There are so many fun ways to use them.

-Liz

Photoshop Silhouette Tutorial Part II - 4 years later!


Four years ago I posted a Photoshop Silhouette Tutorial. Since then we have added 3 more children to our family, and I finally got around to making silhouettes of the rest of our children. Poor Matthew joined our family 3 years ago, and I just made his! I was going to update my tutorial, but after watching my old video, I realized I made my silhouette the same way and there wasn't much to update.

You can watch the tutorial here:


Instead of making a new tutorial I'm just going to share my new silhouette wall. Here's our youngest son. I found an old frame at a thrift store and decorated his silhouette with some digital scrapbook paper form The Lilypad. I printed it out on my home printer.


Here's our updated wall. Now that I'm look at it the crooked frames are driving me crazy! I need to go fix them.


Here's the wall in our old house. Not sure which one I like better. I don't have that wall space in the new house.


Check out this page I scrapped way back when, when I only had 3 kids. I really need to do this again.


If you have any questions let me know.

-Liz

Christmas Poster Made with Digital Scrapbook Elements


I have this wooden hanger in my living room, and I switch out posters on it. Usually the posters coordinate with whatever we are learning in school. For Christmas I wanted something a little more festive and couldn't quite find what I wanted. Since I'm handy in Photoshop I thought, why not make my own?

So I did!

I realize my poster is a little small for the wooden frames. Apparently I was off on my measurements. Next time I make another poster I'll be sure to order something a bit bigger.


I started with a blank 11x17 canvas in Photoshop and then used elements from this kit to make a wreath like frame. I used Ctrl+J to duplicate the different elements, and I used the move tool to rotate the elements until everything look good.


I used Mulberry Script Pro Bold to type up my words.


Then I used Persnickety Prints to print my poster. I ordered an 11x17 Pearl Press Print. It has a nice shiny pearl look to it. It was only $1 extra to get the Pearl Print. Totally worth it.


Now, if I could only get the rest of my Christmas decorations up!
-Liz

Photoshop for other things....

Who knew you could us Photoshop for things other than scrapbooking? Actually I've used it for a few things over the years besides digital scrapbooking. I've used it for baby showersframed artsilhouettesschool worksheetschore cards and homeschooling bins (I still use those bins 3 years later!). Wow, I got a little sidetracked looking at old blog posts.


I also use Photoshop to design my chalkboards. Sometimes I freestyle my chalkboards, sometimes I find something on pinterest and just copy it, but sometimes I just need to work it out in Photoshop first.  I had an idea in my head, so I pulled out old, trusty Photoshop. I found some pretty fonts and just started putting things together. I love contol+J or the alt+drag to duplicate and the ctrl+z to undo. I want those buttons in real life (wouldn't it make things so much easier?). This is what I came up with in Photoshop:


Then I got to work on my chalkboard. My husband laments that I don't use a projector, or ruler for that matter. I just kind of find a center point and work out. It's not perfect, but I was happy with it.


It's my New Year's Chalkboard. It will stay up for awhile until I get bored with it, which won't be too long.

Have you used Photoshop for other projects? I want to hear about them!
-Liz

Joy to the World: Print & Free Template

I needed (I guess it was more of a want!) a Christmas print for a frame in my hallway. Since I'm handy with photoshop, and I have all of these beautiful kits to use, why not make my own? So, I did. Here's how it turned out:

Everyday December by Juno Designs
World Paper from Leavin' on a Jet Plane by Laura Banasiak and Jenn Barrette

Look at those shadows. It looks like I made it with real scrapbook supplies.

What do you think? I no longer have a color printer, so I had to order a print. I chose Walmart since I wanted it in a hurry. I think it turned out pretty good. This is what it looked like in photoshop:


And since I went through all that trouble to make it (really it wasn't that much trouble), I thought I would share the template I made to create the print. Just click the image to download. There is a .psd, tiff, .page, and pngs included in the download.

http://store.scrappingwithliz.com/download/SwL_JoytotheWorldPrintTemplate.zip
-Liz

Valentine's: Chalkboard & Journal Cards


Hello all! I'm here with a special Sunday post just because I wanted to show you my Valentine's Day Chalkboard and some journal cards I made for the special day.

For this month's chalkboard, I just doodled a design on 8.5x11 paper and drew it on the chalkboard. So this is probably my most free form chalkboard yet. I usually take ideas from pinterest or type something up in Photoshop, but I think I was being a bit lazy and just wanted to get it done. Take a look at last year's Valentine's Chalkboard here. I think I like this year better.


Here are some different journal cards I made with my new set of Journal Card Templates. (no longer available) I needed some Valentine's Cards and these worked perfectly. I used kits from Scrap Orchard (more details below) and printed them at Persnickety Prints. They have a journal card printing option that I love. They are perfect for non-photo prints. You can even have them cut the corners to be rounded. I opted to do it myself on one of the cards since I have a nifty corner rounder cutter.


I made this for the Grandparents and such. It was the most recent (decent) photo I could find of all 4 of my kids together...I really need to work on that.

In Love Journal Card Templates by Scrapping with Liz
Using Paper from Everyday Joy by Forever Joy Designs
 Then I made this for my kids to give to a few of their friends. We'll probably tape some candy to the back or something. Can you tell that I've really thought through this? Not really, I'm always sort of winging it.

In Love Journal Card Templates by Scrapping with Liz
Bee Mine by mle Card Designs
Then I made these to take to our local nursing home and pass out. We might tape something to the back of this to...just to get the girls more involved.

In Love Journal Card Templates by Scrapping with Liz
Retired Scrap Orchard Mega Kit from February 2013
Amber Shawn and Tinkled Pink Design have these awesome coupons in their store, and I ordered some 3x4 prints of these for my hubby to give to our girls on Valentine's Day. They'll get one special lunch date with Daddy.

Love You More {Love Coupons} by Amber Shawn and Tickled Pink Studio

Do you ever make homemade digi cards? It's a lot of fun!
-Liz

DIY New Year Chalkboard & A Look Back


It's time for another chalkboard. I made this one to help ring in the New Year. I found a graphic on Pinterest and went with it. I also made these hanging lanterns since I wanted to incorporate Chinese New Year into my board. I'll keep this up through Chinese New Year, and then I'll probably make a Valentine's related board.

The lantern was one of my first ever silhouette projects (did I mention that I got one for Christmas!). Not too bad. Although, I noticed that I took a close up picture of the lantern that had a tear in it!


My original plan was to make a new chalkboard each month, but that proved to be too much work! So. I just made them when inspiration struck, and when I had time. I went looking through my chalkboards of the last year, and it was kind of fun to look back at them. 

Here they are just for fun. They are linked with their original blog post just in case you want to read more about them.

Last Christmas


I really wish I would have taken an "after" picture. We added rivers, cities, pictures, facts, etc....

One of my most favorite boards! Definitely doing this next summer...or maybe I'll do it in the fall for a Fall Bucket List.

I really liked this one too. Might do this one again next year.


-Liz

DIY: Chalkboard, Baby Shower, Christmas, Advent


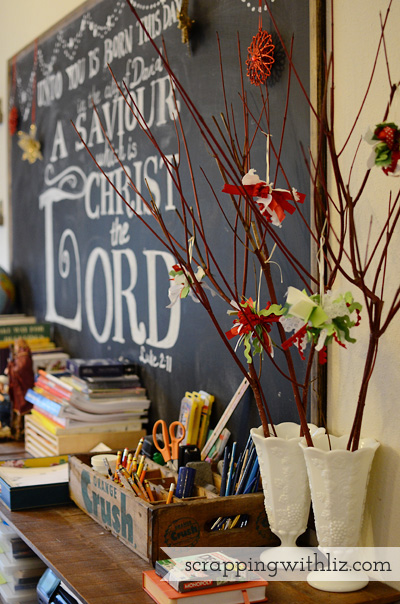
A Savior is Born

This post is kind of a collection of some of the other (non-digi) crafty things I've done this month.  I always have grand plans of doing different posts for each project....but well, it never happens. There are just not enough hours in the day. The photos always just sit in their folder waiting to be blogged about. So today I'm going to share a few photos of some of the projects I've done around the house this month....before I forget about them!

First is my chalkboard. Remember my Christmas chalkboard from last year? Well, it was time to make a new one. I searched different Christmas chalkboard art on Pinterest and mixed and matched a few that I like, and I ended up with this.

Oh my goodness. Look at how much stuff I've added to my bookshelves! #homeschoolhastakenovermylife

Christmas Decor

I decided that this Christmas season we were going to start a new tradition. All the kids are going to make a Christmas ornament each year. When they are grown and have their own tree they'll get to keep all the ornaments they've made through the years. There were plenty of ideas on Pinterest, and we came across these pom pom ornaments, but we made them our own by using different scraps of ribbon I had on hand. I decided the twigs that I found in my back yard (free is awesome) needed some dressing up. We hung them on the twigs instead of the Christmas tree.


I decided to do an advent countdown with journal cards. I found these cards from Amber Shaw (no longer available), and they were perfect. I used Persnickety Prints to print them...they have a nice journal card printing option with rounded corners! Perfect. Each night, after reading different Christmas themed verses from the Bible and reading a Christmas book, we write down (on the back of the card) our favorite memory from the day. My plan is to keep the journal cards and make a little book out of them. It will be fun to look back on them throughout the years....this is another new tradition I've decided to start this year. I'm hoping all these new traditions stick....we'll see!

Pocket Scrapping Countdown Cards


The above photo holder usually holds Instagram photos. Since I had all those photos hangin' out I decided to make this little Instagram tree. It hangs on our magnet board downstairs...all by its lonesome with no other Christmas decorations. It's kind of cute. My 6 year old made the star for the top.

DIY Instagram Christmas Tree

And then there was a baby shower. One of my dear friends is welcoming a new little boy into the world any day now. I decided to utilize my chalkboard and use it as some of the shower decor (this was the day before I made the Christmas chalkboard).
Boy Baby Shower DIY Chalkboard

I made little onesies for her then used them, along with the leftover scraps, to make a little banner. Yes, I'm getting into sewing and applique a little bit....like I need another hobby. Actually, my girls are mostly getting into it. I just kind of do it when I need a break from scrapping or working!


-Liz

Thanksgiving Chalkboard


While I'm sitting here waiting for our immigration paperwork (yes, it seems like it's taking forever), I thought I would share a little something I made for Thanksgiving on my DIY chalkboard. A couple of weeks ago I wrote out Be Thankful on my board, and each week the family has been writing what we are thankful for on it. By Thanksgiving, it will be so full of things we are thankful for. I know I'm going to love reading back over it with the family around the dinner table. I think I'm even going to scrap a page with the list of things that are written on the board. Wouldn't that be a cool thing to do each year?

-Liz

*Note for next year: No one is allowed to write something already written on the board.
I think that will allow for more creative thinking and thankfulness. 


Summer Bucket List - Chalkboard Style


I was recently inspired by Kami of Ziggle Designs to make a Summer Bucket List. Kami has all these cool new digital scrapbook products that are so much fun for documenting your Summer Bucket List.

*no longer available

There are lots of different ways you can make a list (just do a little search on Pinterest). I decided to make my list on the chalkboard in my dining room. 


Each week I'm going to let the girls pick a couple things off of our list to do. Last week we checked off going to the pool and sew apron with Emmie. This week we are working on teaching Kyla to ride her bike (I have the scraped up legs to prove it) and we'll also be checking off camping and perhaps geocaching, playing in the creek and hiking a new trail. Hopefully, we'll accomplish those last three while camping this weekend.


I do plan on scrapping my pages. I haven't made a real plan yet though. I don't know if I'll make a separate album or add the pages to my yearly family album. I'm just going with the flow here. I'll be sure to update you all on my pages and what I decide to do.

I think I forgot to show you my last chalkboard. I originally planned to change up my chalkboard every month but that proved to be too much work. We did a little unit study on China so I drew a map of China so that we could add things to it as we learned. I REALLY wish I would have taken a picture once we were done with our unit study....but I didn't. We added several cities, rivers, and facts. It looked much more "filled in"...and don't listen to my hubby who said my drawing looked like a giant Chicken!


So, what are some things you want to do this summer?
-Liz

Printed & Framed Silhouette


I posted a video tutorial on Wednesday showing you how to make your own silhouette using photoshop (also works in photoshop elements) and I promised you I would show you my finished product today.

This was the silhouette before I added any paper to it. If you watched the video you'll know that I saved the silhouette as a png file.


Using Paper from Vintage Sprout by the Scrap Orchard Designers

Then I took that png file and put it on a new canvas in Photoshop sized 8.5x11 for easy home printing.
I added a background paper, clipped a paper to the silhouette and added a drop shadow to make it look more realistic. I also added Lydia's full name and the date of the silhouette (blurred out for privacy reasons).


I printed it on my home printed. Looks pretty nice! 


Then framed it and added it to my gallery wall.


You can see it to the far right. Can you also spot the silhouettes of my other daughters?

All products used are retired.
I thought I would show you this page. I made this 3 years ago and I still love it to this day...except for the fact that it's missing one little face. This is just an example of how you can also scrapbook your silhouette.

Now I guess it's time to make a new digital scrapbook page with four little silhouettes!
-Liz

© Scrapping with Liz
Maira Gall